Search This Blog

Showing posts with label recipe. Show all posts

Tuesday, February 16, 2016

Layered Pineapple Upside-down Cake


  Every year on his birthday, the Other Half gets a pineapple upside-down cake - His favorite. But I mean, c'mon! It's a birthday cake! Shouldn't it be a little more special than just your average pineapple upside-down cake? So for his birthday last month, I had two missions: Make it more special, but also try to make it a little less bad-for-you. I succeeded at one of those goals... I fell a little short of the other one.


  But, it's still just a tiny little bit less-bad! Usually, I make an entire 9 x 13 pan of this cake, but I can only fit one can of pineapple in it. Plus, all that sugary, buttery topping that pineapple upside-down is famous for! I'm worried about the hubby developing diabetes because his father had it. And now that he's getting older, gaining weight, and still hasn't done anything to change his diet, I'm even more worried about it. His favorite thing for his birthday could very well become his death sentence!


  Last year, I tried to change the cake. That was a bust. The less-butter, less-sugar cake I made was tasteless and dry. No amount of gooey topping could change it. This year, I went back to the classic cake (see the recipe for how I already make that a-little-healthier!), and worked to change that topping instead. By baking the cake in two smaller round pans, I was able to fit two cans of pineapple in the cake. More fruit = good, right? (Well, kinda...) And then I reduced the amount of butter and sugar for the topping, so there will be just a kiss of that caramel-y goodness.


  It's a hit! The cake was moist without being drenched in butter/sugar sauce, the extra fruit added a ton of flavor, and he ate half the cake in under two days. If only I could get him to understand that cake does not equal "good for you" just because it has fruit in it. So much for trying to get him to eat healthier! Let's get to that recipe:


For the prep work:
One 8" and one 9" round cake pans
*I used spring-form pans, because that's all I have right now! I tried two 8" round pans, but the batter was almost overflowing. If you don't have/want two different sizes, use two 9" pans.
Non-stick spray
Flour for dusting
Electric stand or handheld mixer


For the topping:
2 tablespoons butter, divided
4 tablespoons brown sugar
(2) 20 oz. cans pineapple - in juice, not syrup - minus about 1/2 can
*You'll need some of that juice for the cake! Make sure to reserve 1/4 cup of the liquid, and reserve about 1/2 can of fruit for cake


For the cake:
1/2 cup (1 stick) unsalted butter
1 - 1/2 cups sugar
3 large eggs
2 - 1/4 cups all-purpose flour
3/4 teaspoon salt
3 - 1/2 teaspoon baking powder
1 cup milk
1/4 cup reserved pineapple juice
1 teaspoon vanilla extract
About 1/2 can pineapple reserved from topping, plus flour for dusting

Used as garnish (optional):
Dried pineapple pieces and dried sweetened cranberries


Directions:


Preheat the oven to 350°F.


While the oven preheats, prepare the pans. Spray the sides with non-stick cooking spray and dust with flour.

I got quite a bit of over-spray on the bottoms of my pans, resulting in much of the base being floured, too. The little extra flour just adds some glossiness to the topping, and I don't worry about cleaning it up unless there's big clumps.
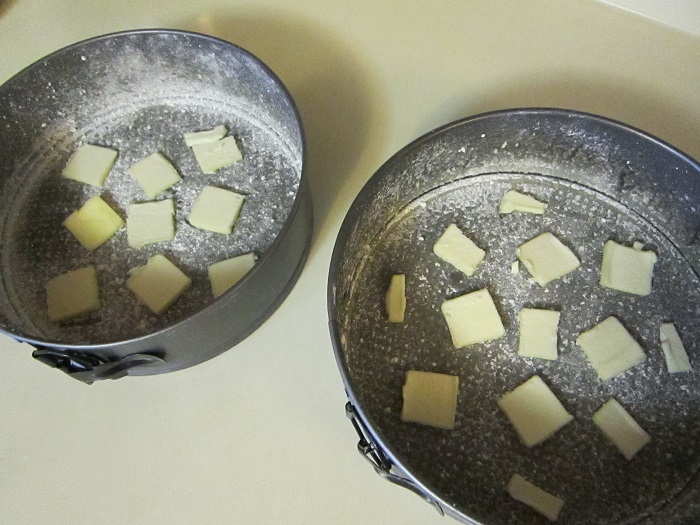


There's just one tablespoon of butter -sliced thin- for the topping in each pan - plus or minus a little. Since one pan is bigger, I take one from the small pan and divide it in the larger pan.


Pop the pans in the preheating oven for a minute to melt the butter.
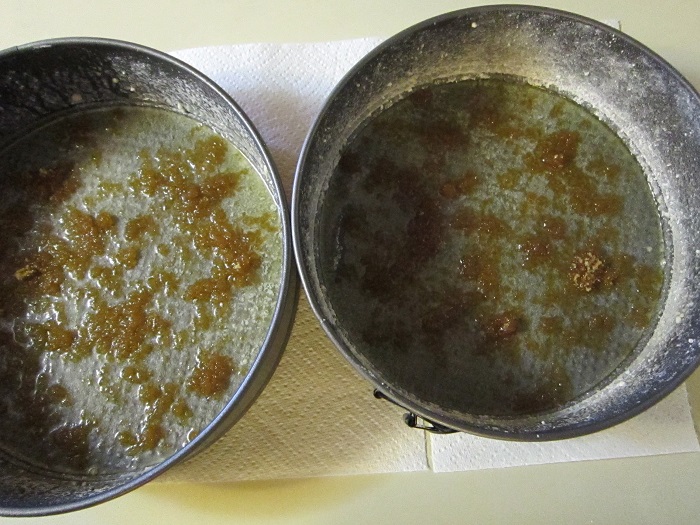


Only a minute to melt that thinly sliced butter! Now, to add the sugar: As for the butter, I take a bit from the two tablespoons of sugar in the small pan and add it to the two tablespoons in the larger pan.


Place the pineapple rings in each pan as close to each other as possible, but don't crush them together.


Now, for the cake!

  This classic yellow cake is moist and buttery... And not exactly a healthy option. In my opinion, you just can't have yellow cake - or cake at all - without butter. To make this cake without butter is like making frosting without sugar. It might look like cake, but it will have a taste and texture more like something from the local sawmill. Use butter, or don't make the cake.

  Where we get to make it a little healthier is with the milk - Go ahead and use non-fat if you want to. Or, use whole milk if you want. Either way, we're going to take a little of the milk out of the classic butter cake, and add that reserved pineapple juice.

  Now, I learned the hard way that this makes a little extra work... You already have to alternate adding the dry ingredients and the milk, but you can't just add the milk to the pineapple juice, so you'll have to alternate three things. The first time I tried this recipe I dumped the pineapple juice into the milk right before I started creaming the first ingredients, and the milk was cottage cheese by the time I needed to add it. So, don't skip that step. I know it's more work, but it's worth it. Something about the juice - maybe the acidity? - makes the cake even softer and fluffier than your average yellow cake.


The first thing to do is cream the butter and sugar together. Beat on medium to high until the mixture is light yellow and fluffy.


Add the eggs one at a time while mixing, and then the vanilla. Beat until the mixture is smooth, creamy, and golden yellow.


The remaining steps are too difficult for me to do while taking pictures, but you'll be okay from here: Sift together the dry ingredients, and measure out the milk and pineapple juice. Usually, you would alternate adding the flour mixture and the milk in thirds, but you'll need to stretch those dry ingredients a little farther.

While mixing on medium speed, add less than a cup of the dry ingredients. Mixing until incorporated between each: About a fourth of the milk, then another scant cup of flour mixture. Add half of the pineapple juice, more flour, another fourth of milk, flour again, and the other half of the juice. Alternate the remaining flour and milk until completely incorporated.


Split the batter between the pans, adding about a cup extra to the larger pan, if using two sizes. Sprinkle the remaining pineapple slices with flour, place on top of the batter in the larger pan (or whichever will be the bottom layer).


Even if you're using two pans that are the same size, your bottom layer with the extra fruit may need up to 10 minutes of additional cooking time. Bake 50 minutes to 1 hour, until the tops are golden brown and a toothpick inserted comes out clean. (Find a spot without fruit to check it!)


Allow the cakes to rest on a wire rack just until cool enough to handle.

Now, fun! Invert the larger or bottom layer onto a plate. Place the plate on top of the cake, hold the plate and cake pan firmly together, and flip!


Here's the "dirty" part: You have one shot here. Once the sticky top touches the bottom cake, it stays there. You're not moving it. You'll probably have to touch the cake a little, unless you have magic powers. But that's okay, since this doesn't have all that runny, gooey topping! You might get a little sticky. The top layer is more difficult to flip onto the existing cake. Line up the edge where you want it, hold it in place with a (clean) hand as you gently invert the pan, and hold your breath as you slide it off.


Many people like to add maraschino cherries, but The Other Half prefers his pineapple upside-down cake with strawberries. Of course at the time, strawberries weren't available. I stuck to just pineapple this time, and chose to garnish it with some crushed dried pineapple.

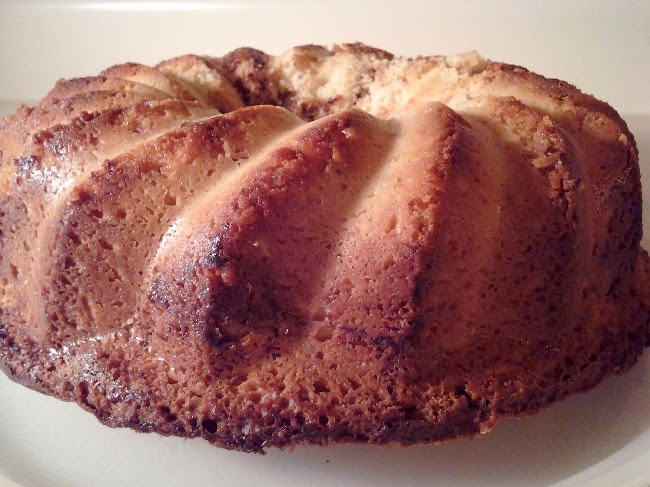
As you can see in the first display photo, I added some dried cranberries to pretty it up with a bit of color. I thought about baking them into the cake to replace the strawberries, and I'm sooo glad I didn't. I liked it. A lot. But The Other Half took one bite with the cranberries and pushed the rest of the garnish to the side. Oh well. At least he still says it's the best pineapple upside-down cake he's ever had, and he doesn't even notice that I cut the sugary topping in half, added more fruit, and replaced a bit of the fat.


Happy Baking!


Wednesday, November 11, 2015

Baking with Cuplettes


 I recently had the awesome opportunity to work with new Cuplettes baking trays. I'll admit that I was skeptical at first, until I started cooking. It seems like every kitchen tool out there promises to easily cook, chop, or slice your food, but none of them ever work as “easily” as they advertise. Here is a product that claims to help you make fillable confections. The last time I tried to fill a baked item, I made exploding jelly doughnuts. This could be dangerous… Or at least, really messy.


Cuplettes, baking, recipes, brownies


 But, the design of Cuplettes actually does create perfect cups of almost whatever you want to bake! Cakes, breads and pastries can all be turned into amazing little cups waiting to be filled with frosting, filling, or whatever you can think of. The flexible silicone material makes it super-easy to pop your cakes and confections out of the trays. And they're amazingly easy to clean in case of sticking, as I did experience.


 I could have tested this product the easy way, but I wanted to push Cuplettes to their full potential. Although I didn’t use paper liners for my cakes and pastries, all of them came out of the trays with minimal sticking. A few of my non-cake experiments didn’t work so well, and left me with a horrible mess. Even though it looked like a disaster, just a few minutes of cleaning returned Cuplettes to their original condition!


meringue, recipes, Cuplettes


 I had a really great recipe idea requiring cups of meringue, which is already difficult enough to make in humid Florida heat. I was worried that the meringue would deflate when installing the Cuplettes inserts into the trays. With a chilled bowl for mixing, and gentle movements while assembling the trays, I succeeded in creating the meringue, filling the trays, and snapping in the inserts without disaster.


 But… I failed to think about the science behind meringue. It dehydrates while cooking at a low temperature, more than it actually bakes. After leaving the trays in the oven for the usual cooking time, I tried to remove an insert. The top of the cup came out with it, exposing what looked like raw meringue inside. I returned them to the oven at a higher temperature, assuming that they would need a longer cooking time in the silicone trays. When the house smelled like toasted marshmallows and the edges of the cups were a beautiful golden-brown, I set them on a rack to cool.


 I removed another insert, only to see sticky meringue after the top came off again. Knowing I couldn’t bake them much longer without burning them, I sacrificed the top layer of all of them. Once returned to the oven without the inserts, the meringue hardened in twenty minutes. But what were beautiful cups before, now looked like deflated disks. Much of the meringue was left stuck to the trays, and I threw them in a sink of soapy hot water in disgust. Defeated, I took the dog for a walk to think about what I would do next.


 I feared the mess I had to face when I returned. How surprised I was to come back to beautifully clean Cuplettes! Every bit of the meringue was released from the trays and was left floating in the water. In just a few minutes, I had my Cuplettes clean and dry; ready for another experiment. I attempted a few more batches of meringue at different cooking times and temperatures, but never succeeded in making anything other than a mess. The neighbors enjoyed my deflated meringue “cookies”, and I abandoned the recipe.


Cuplettes, cleaning


 Cuplettes gave me another surprise when I tested them with angel food cake. Forget all the work of making the batter - I skipped that and used a boxed mix. But, angel food can still be tricky because you have to turn the pan upside-down, without touching a surface. Many choose to turn a Bundt pan over a bottle, or prop square pans on their sides. At first, I was disappointed because the three trays of Cuplettes would take up more room while cooling. Then I realized: The inserts keep the trays elevated from the surface, so you can turn them upside down on a cooling rack with no trouble! This was the easiest angel food cake I’ve ever made.


Cuplettes, cooling, baking


 I can admit that I made a few mistakes along the way, and made a couple of messes. But in the end, I’m still excited to try more recipes in Cuplettes. Now that I know the silicone trays and inserts are so easy to clean, I won’t fear a disaster. What can we make fillable next? Meatloaf cups? Stuffable dinner rolls? Ooo, what about fudge? From sweet to savory, the possibilities are almost endless. Almost. Those meringue cups still need improvement.


https://www.guidecentr.al/make-southwestern-egg-and-cheese-cups


 There are too many reasons to list why Cuplettes are so great! You can make fancy appetizer bites for entertaining. Get kids to eat more fruits and veggies by making “surprise” cups. Impress the family with your amazing creations. Bake red and green Christmas cupcakes, or spooky creations for Halloween! And best of all, you can get 10% off of your order of Cuplettes by using the coupon code GUIDECENTRAL at checkout (US residents). Just go to www.cuplettes.com to order yours, and you’ll be making awesome sweet and savory filled cups in no time!


https://www.guidecentr.al/make-strawberry-custard-filled-cupcakes


Happy Cooking!


Head on over to Guidecentral to check out the recipes I've created with Cuplettes! Keep your eye out for more coming soon!

https://www.guidecentr.al/bake-peanut-butter-stuffed-brownie-cups
Bake Peanut Butter Cheesecake Stuffed Brownie Cups (Brownie cups filled with easy no-bake cheesecake filling; topped with a peanut butter glaze)


Make Strawberry Custard Filled Cupcakes (Angel food cupcakes filled with strawberry preserves and stirred custard; topped with an optional chocolate glaze)


Make Southwestern Egg and Cheese Cups (Phyllo dough cups filled with re-fried beans, picante sauce, egg and cheese)


Tuesday, November 10, 2015

Recipe: Fried Banana Bites


  Let's call this an "upcycle recipe". Nothing gets wasted around here - not even brown, mushy bananas! If they're not bad enough to be compost-worthy, they usually become banana bread or muffins. But, c'mon... We have leftover bananas almost every week. How much banana bread can you eat? Although this recipe isn't terribly different from banana bread and it's certainly not health food, at least it's a change.


  The result is a chewy, doughnut-like bite that is mildly sweet - Which makes it perfect for a dipping sauce of your choice. Caramel? Chocolate? Maple syrup! Or, just dust them with powdered sugar. Personally, I like them plain, with a cup of coffee on the side. The choice is yours! :)


recipes, cooking, banana


  The inspiration for these bites came from a simple drop biscuit recipe. I replaced the fat with the fruit, so I suppose that makes them a bit healthier... But then they're fried in oil, so you can probably throw that out the door. I tried to bake them for a low-fat option, but the dough has to be thickened first, which makes them drier. Without the fat in the recipe, they come out like sawdust. Without thickening the dough, the baked ones come out like cookie-crackers. Perhaps I'll perfect it in time, but for now, at least they're fried in "healthy" oil.


  This recipe might come out a little different depending on the ripeness and amount of bananas you use. Plus - Depending on if you use nuts or not, your yield may vary. I'll give you tips for getting it right no matter what, and show you where I went wrong... Actually, the Other Half did that... Oh well - Just follow along!


Ingredients:
2 cups flour (You can use whole wheat, but you will need to increase the amount of liquid.)
4 tsp baking powder
1 tsp salt
2 tbsp brown sugar
Milk (Amount will vary - I generally use less than 1/2 cup, and sometimes none at all, as you will see later.)
Bananas - At least two. Four is better. (Six was too many, lol.)
1 tsp vanilla extract
Nuts, chocolate chips, dried fruit, etc. (*Optional - See explanation after recipe)


Directions:


  • Since parts of this recipe may vary for you, let's start with the one thing that will remain the same: The dry ingredients. Sift together the flour, baking powder, sugar and salt.

  • The Other Half helped me by mashing the bananas for this batch. That's where I had to improvise. The bananas should be slightly mashed, with bits of whole fruit remaining. He got heavy-handed with the potato masher, and completely liquefied all six of these bananas - When I only needed four. Whoops! I could have removed some of the fruit, but I decided to see what would happen if we used it all for this batch. 


recipe, cooking, dry ingredients, bananas


  • I usually mix the vanilla extract in with the milk, but since there was no adding milk this time, I added it to the banana puree.


recipe, banana bites


  • If your fruit is still partly whole, then you should mix it in as you would cut in shortening for biscuits. Since mine was pureed, it made the batter the perfect consistency without adding milk. If your batter is more like a stiff dough, then start stirring in some milk. The final result should drop easily from a spoon, but hold its shape for a few seconds.


recipe, batter, banana


  • I suppose you could deep fry these like doughnuts, but I do them in a pan on the stove with less oil, and flip them halfway through. I use a blend of canola and grape seed oil for frying. I find that the cooking temperature varies with the batter. When I add milk to the recipe, I heat the oil on medium-high, and they take about a minute per side to cook - Just enough time to fill the pan before flipping the batch. When I fried this batch with no milk in the batter, they cooked in under 30 seconds a side and started to burn! I had to reduce the temperature to medium. Test a spoonful of yours before cooking up a whole pan.


  So, besides the bananas, how is this an "upcyle recipe"? I go on a cupboard-cleaning mission whenever I make a batch of these bites. Sometimes, I dice up an apple to add to the batter, or toss in that handful of chocolate chips that have been forgotten in the back of the refrigerator. This time, I added the remainder of this bag of walnuts:


recipe, banana bites, walnuts


  We went a little nuts (no pun intended, but ha!) over these honey-roasted walnuts. Once we tried one bag, we started buying one or two a week. At first, they were snacked on alone. Then we started making trail mix. And finally, we were burned out on eating them. What's left in this bag has been sitting in the cabinet for over a month. This recipe was perfect for using them up! Next time, maybe I'll add the rest of those cranberries from the trail mix. :)


  Changing what's added to the batter keeps this recipe from getting old when I make two batches back-to-back. I just made some a few days before I made these, but the week's bananas gave me a surprise. They didn't look that bad, but when I picked up the bunch, the tops split:


recipe, banana


  Oops! They were still green under those brown spots, and the fruit inside was firm. Since I already have a few bananas in the freezer from the last time this happened, I didn't want to put more in there. And it seemed a waste to throw them in the compost.


  Do you have trouble keeping bananas fresh? What do you do with the mushy ones? If I make any more banana bread with them, I'm going to go bananas. I already have those bananas in the freezer waiting to be... Oh no! I froze those for banana bread! Help!


bananas, Wal-Mart produce


Happy Cooking!


Wednesday, November 5, 2014

Recipe: Apple-Cinnamon Sour Cream Coffee Cake with Spiced Brown Butter Glaze


  This recipe is a moist, fruity alternative to your average coffee cake. Apples and cinnamon replace the traditional nut and spice filling, making this a better option where nut allergies may be a concern. The optional Spiced Brown Butter glaze compliments the fruit with a creamy, caramel-y flavor.


  A healthier version of this delicious coffee cake can be made by skipping the glaze, replacing butter with margarine, and using low fat sour cream or Greek yogurt. Serve topped with fresh fruit, yogurt, or a combination of both.


For the Filling:
1/2 cup (113 g) packed brown sugar
2 small to medium apples, peeled, cored, and chopped
1 tbsp (14 g) ground cinnamon


For the Cake:
3 cups (665 g) all purpose flour
2 tsp (28 g) baking powder
1 1/2 tsp (7.5 mL) baking soda
3/4 tsp (6.5 mL) salt
1 1/2 cups (337.5 g)granulated sugar
3/4 cup (170 g) butter (1 1/2 sticks) or margarine, softened
2 tsp (10 mL) vanilla extract
3 eggs
1 1/2 cups (337.5 g) sour cream


For the Spiced Brown Butter Glaze:
1/4 cup (56.7 g) butter (1/2 stick)
2 cups (454 g) powdered sugar
1 tsp (5 mL) ground cinnamon
1 tsp (5 mL) vanilla*
1 1/2 - 2 tbsp (28 g) milk**


If you're not good at following recipe directions, or you're new to baking, click here for a step by step tutorial!


Directions:

Preheat oven to 350 F (176.6 C).

1. Combine the ingredients for the filling in a small mixing bowl. Toss to coat the apples, then set the mixture aside.


2. Sift the flour, baking powder, baking soda, and salt together in a medium mixing bowl. In a large mixing bowl, cream 3/4 cup (170 g) and 1 1/2 cups (337.5 g) sugar together. Beat in eggs and vanilla. Mix in about 1/4 of the sifted dry ingredients, then 1/4 of the sour cream. Continue alternating the dry ingredients and sour cream until completely blended. Scrape the bowl as you work to completely incorporate ingredients.


3. In a greased 12 cup (2.8 L) Bundt or angel food cake pan, spread about 1/3 of the batter. Top with about 1/3 of the filling mixture. Continue alternating batter and filling, using about 1/3 of the mixture in each layer. Place the cake pan on a cookie sheet for easy handling and clean up in case of spills.


4. Bake for 1 hour to 1 hour and 15 minutes. A knife or toothpick inserted will come out clean when done. Allow to cool on a wire rack, then invert on a plate. Prepare glaze while cake is baking.


Spiced Brown Butter Glaze:


1. Melt 1/4 cup (56.7 g) butter in a small saucepan over medium-low heat. Cook until golden brown in color, swirling pan or stirring constantly.


2. Remove from heat, whisk in powdered sugar and extract*.


3. Whisk in milk, 1 tsp (5 mL) at a time**. Drizzle hot glaze over cooled cake. Glaze will harden as it cools.


*For a variation, try using lemon, coconut, or any other choice of extract, or use apple juice to replace extract and milk.

**Depending on humidity levels, the amount of milk you use may be more or less than this measurement. Add until the glaze is runny enough to drizzle over cake.